 That makes it seem like I'm a little reluctant when it comes to changing work environments. Maybe I am... Or maybe I just think using Vim makes me cool (not true).


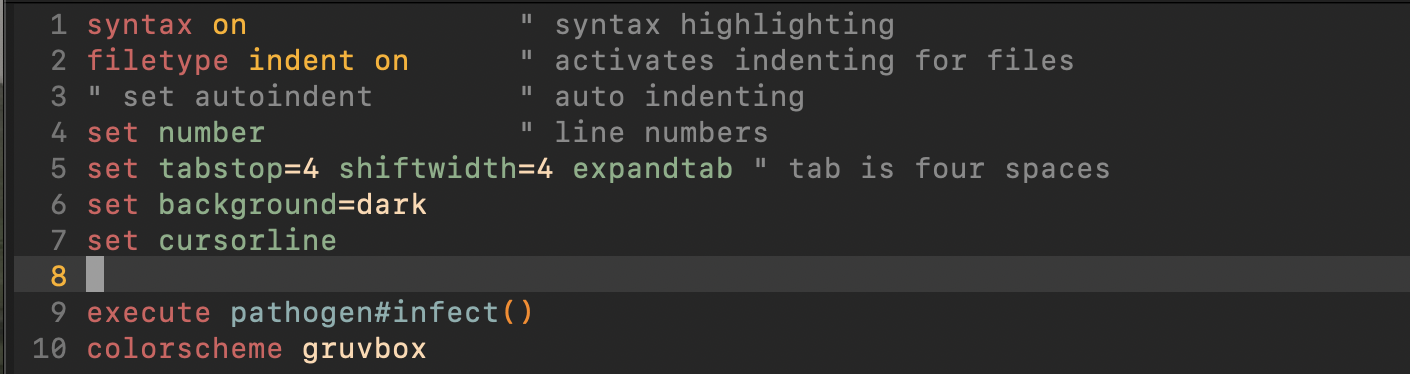
Since I use Vim, I also wanted features like cursor line, line number, syntax coloring, one tab = four spaces, indenting, and a slightly different background color to show that I'm in Vim. There are many other features for Vim, some of which you can find here, with a bunch of color schemes, vertical cursor lines, keyboard shortcuts (if you don't like the defaults), etc. You can also download custom plug-ins and themes, like I ended up doing, to get this:
Do note that some settings, i.e. font size, are better set in your terminal emulator! If you don't know what that is, the terminal itself is just an interface that we can interact with our machines with. A terminal emulator is the thing that lets you interact with the terminal/shows you the terminal, in a sense. Sort of like how a Nintendo DS emulator can shows us games, but the emulator isn't the game itself. For a Mac, it's just called "Terminal", but some people prefer XTerm, Yakuake, Kitty, ST, etc.
Your .bashrc/.bash_profile files are run at startup. A bash script is basically a list of terminal commands. This means that commands you put into them are run right as you open up the terminal. This is commonly used to edit the $PATH variable to tell your machine where to search for executable commands, and other initialization. If you don't have either of these files, you can make one with the command touch .bashrc or similar, in the root directory.
The PS1 variable controls the formatting of terminal prompts. I have no idea what PS1 means, but it's definitely not PlayStation One lol. Setting this variable controls the text that is printed. To set it, do something like this: export PS1='\[\e[1;31m\][\u@\h \W]\$ \[\e[1;33m\]'. Broken down, here's what that command means:
- export PS1 = '....' Sets the value of the variable PS1. All bash variables are strings, hence why its value is enclosed in ' '.
- \[\e[1;31m\] You may be wondering why the square brackets don't close. That's because \e[1;31m is an expression on its own, and is surrounded by \[ and \], which indicates that it's a special string, not to be printed in the terminal.
This part formats text to be bold and red. Specifically: 1 indicates that the font should have the bold effect and 31 indicates that it's for text and should be red.
Color codes basically follow ANSI escape codes. There are also ways to include custom codes, look up CLICOLOR and LS_COLOR. I often use this site as reference, specifically the Colours, Effects, and Backgrounds tables, which I'll put for you here:
Color Effects Backgrounds 30 Black 31 Red 32 Green 33 Yellow 34 Blue 35 Purple 36 Cyan 37 Grey 00 Default Color 01 Bold 04 Underline 05 Blinking text 40 Black 41 Red 42 Green 43 Yellow 44 Blue 45 Purple 46 Cyan 47 Grey
- [\u@\h \W]\$ Since they aren't escaped by \s, these square brackets are printed. This prints [user@host current directory]$. Note that the $ has to be escaped like \$, since $ is a special character. \u, \h, and \W are special strings that tell the terminal to prin tthe user, hose, and working directory respectively.
- \[\e[1;33m\]' This string has a space in front of it! This makes sure that there's a space between [user@host current directory]$ and the input text you type. Using our code table, we can tell that this sets the text to bold and yellow.
debug()
{
echo -n $'\e[0;32m'; <- set to whatever formatting you want the terminal output to be
}
trap debug DEBUG
These two do essentially the same thing. Calling the debug trap executes at each command, and resets the following text with the echo -n command.
Install Pathogen by running the command mkdir -p ~/.vim/autoload ~/.vim/bundle && \, then the command curl -LSso ~/.vim/autoload/pathogen.vim https://tpo.pe/pathogen.vim.
Install Gruvbox theme by running the command git clone https://github.com/morhetz/gruvbox.git ~/.vim/bundle/gruvbox.
Coupled with the last two lines of my .vimrc file, you should have the theme appear whenever you open Vim!